Sunday, January 20, 2013

Women Fly When Men Aren't Looking...

Leslie here.  Years ago I remember seeing a friend of mine wearing a t-shirt that said these words,
"Women Fly When Men Aren't Looking".  I was amused and captivated by the statement and I guess it got filed in my memory bank!
To create my shoes I chose a set of black sueded stilettos, sky high.  I can tell you my days of wearing shoes such as these are OVER.  Personally, I have a serious shoe fetish and view many of them as sculpture.
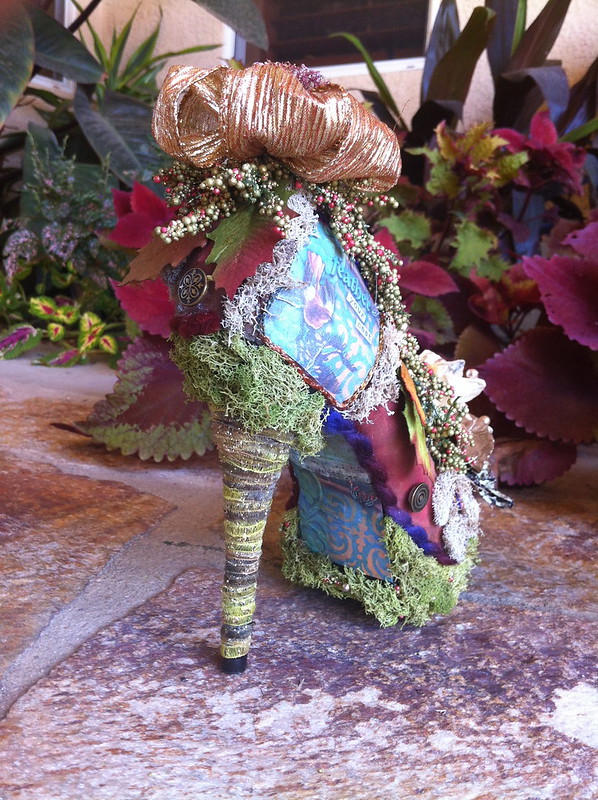
I've been meaning to play around with sari silk yarn as a means of encasing another object but really wasn't sure I could pull it off on shoes.  Thank goodness for Yes! glue:  it was just what I needed to be able to coil the strands of silk yarn onto the shoe surface.  I began by covering the surface of the shoe, excluding the heel (which I did separately afterward), with Yes! glue.  I gently positioned one strand of the sari silk on the seam of the edge and wound the yarn around and around the shoe, making sure that the yarn, which has varying thicknesses, was closely positioned to the previous wrapping.

First, I painted the surface of the shoes with clear gesso, inside and out.
The suede made it very easy for the gesso to "take hold" of the surface.

I worked around the base, and then the top edge of each shoe.  I configured a separate coil of yarn at the top of each toe.

I did a separate coil around the heel, as well.  This gave the shoe an interesting pattern.
After covering the entire shoe body, I coiled yarn over the stiletto heel in a vertical pattern.
Surprisingly, this was not too difficult.

I created the wings by fusing silk onto Peltex with Mistyfuse, I fused pink to one side of each wing, and blue to the other, but fused the colors on opposing sides.  Once fused, I trimmed around each shape and free-motion stitched the feather patterns onto each wing.  I used blue thread through the needle and florescent orange in the bobbin!

In trying to figure out how to place the wings I realized that I wanted them to be removable.
I couldn't figure out how I would be able to preserve them during shipping, otherwise.
For this I elected to stitch the wings together and placed a thin strip of velcro on the shoe heel and the wings.  This way, the wings are stable on the shoe but are easily removed for shipping!


Here is when I realized I made a mistake in the progression of the construction:
I should have painted the interior of these shoes before I started coiling the yarn.
What was I thinkin?!
In retrospect, I wish I had painted them a matte black.  Oh well.
Since I love to do things the "hard way" (apparently!) I had to handle the shoes differently to 
finish the interiors.  

I decided to "fill" the shoe interiors with a combination of sari silk strips and brightly-colored
funky buttons.  It was really fun to do this, but again, I wish I had figured this part out first.
I love my bright, happy shoes!

Wednesday, January 16, 2013

Call of the Wild - A Fantasy in Two Shoes

Virginia Spiegel here...


The concept for my entry in this fun fundraiser came after I made a comment on FB that I was sure my high heel shoes would have something to do with the outdoors.  A friends said she could just see me lugging my 50 lb. pack in high heels and pearls. I didn't know about that, but it made me think that maybe some wild creatures would like to dress up once in awhile.


In any case, I purchased my first pair of high heels in twenty years.  They are nice sturdy standard black pumps since I knew I would have a lot of "stuff" to add to them.


Just to be on the safe side, I coated the shoes inside and out with two coats of white gesso.  This is coat one.


The trees I had purchased had white bases. I mixed up a nice batch of green paint with a lot of black added and painted both the tree bases and the insides of the shoes.  


I had my fantasy concept of wildlife "putting on the ritz" in the wild, but I wasn't sure exactly how I would actually make it work with the shoes.  So I collected a bunch of stuff that looked like it might work.  The blue fabric was one I painted and monoprinted and ran from blue to green - perfect!  I was thinking pink for the bottom of the shoe, but a blue stenciled piece looked more "lake and forest" in the end.


To fit the contours of the shoes, the fabric was cut into many, many small pieces.  Here the heel is finished with the green fabric and the blue fabric is cut for the body of one shoe.  Gel medium was used for the adhesive.


Both shoes finished - whew! - and coated with several coats of gel medium to seal them.


I love the water-y feel of the fabric I found for the bottom of the shoe.  The fabric was painted and then stenciled using a cardboard coffee holder.  Again, many small pieces and several coats of gel medium to seal.  While I had the gel medium going, I adhered a green ribbon with a pine needle pattern in the inside of the shoe.  You can see a bit of it in the next photo.  I was pretty sure it would never show, but I liked knowing it was there.


Would it be a "Call of the Wild" shoe without a wolf?  I cut a piece of floral foam to fit, added a coat of  thick gel medium to the bottom and wedged it in the back of one of the shoes.  I was worried about the wolf being secure (What can I say? I am a belt and suspenders kind of person), so I made pins out of florist wire and pinned her feet down and added a coat of gel medium on top of the pins.  


I added purchased moss and bark from the river birch in my front yard.  The final fashion touch for the wolf:  A snazzy pink and black purse.


Ms. Bear (modeling a stylish pearl choker) was added to the front of the shoe.  I used E600 glue to secure the bear since she didn't need a florist foam support. Trees, moss, and bark finished out the habitat.  


"Call of the Wild" - Shoe #1.  Onward.


Shoe #2. The moose also is up on a foam support.  I bought many colors of Barbie shoes.  But since this was an elegant outing, I went with silver and aqua shoes. (And, yes, I know this must be a bull moose to have antlers, but work with me here on our little fantasy scene :).  It just wouldn't be the same without the antlers.)

Many of you know how much I love the Boundary Waters Canoe Area Wilderness. This was a way to reference the flora and fauna I've grown to know so well with a little wink of the eye.

Monday, January 7, 2013

15 Minutes to Play with HEELS!

Hi Everyone, 
Victoria Findlay Wolfe here with some RED, smoking, hot, High heels! 


I was so excited to work on this project, that I barely let the dust settle after the UPS man put this box in my eager, creative, little hands...  Now, I do like a GREAT pair of heels,  ( I have only one pair that I covet...Mr. Jimmy Choo) but I deliberately bought these a size 6, so there would be NO chance that I would have a hard time giving these up...Because you see, I wear a size 12...LOL!  But really, I am 6' tall and I don't REALLY need to wear 5" heels... But that didn't  stop my daughter from trying them on and walking around in them...(scary)

First up was to make a pattern of my shoes. Using muslin and a sharpie, I curved the fabric around the shoe, drawing out the shape to give me a basic pattern.

Next, I used the muslin as my pattern, and "Made Fabric" and cut the shape out. I added a inner flap of red so I could easily fold that the inside to keep the shoe looking seamless.

 A pin here,
a bit of HOT glue here, dab there... It's been years since I used a glue gun, and I can add that the skin has now grown back on my finger tips...making this all stay together...LOL!


I grabbed some red velvet ribbon to seal up the edges, and make a cleaner line around the shoe.  Then added the Fun YELLOW zipper flowers, that I found in my "garment center" hood...I thought they added a nice ZING to the shoe. ( and a nod to the Inspirational Jamie's zipper work)


I had so much fun making these, It inspired me to think even MORE out of the box, then I already do! Just shows how taking 15 Minutes really can pay off... bit by bit...ideas come! 

Focusing on form rather then function, although, I may just have to go order me a pair of  size 12's now... then function would be my reality! (and not my 12 year old daughter's!) It is about the funniest thing you've ever seen, watching her ATTEMPT to walk around in these!
Thanks Sue and Jamie for asking me to play along!

Victoria

Sunday, December 16, 2012

Ocean Dreaming

Jamie Fingal checking in to share my process for 'Ocean Dreaming.'  This pair began with burgundy snake skin-like high heels, and if you look in the left corner of the picture, you can see the original shoe.  I was painting a couple of pairs at one time, so that is why there are 4 high heels in the picture.  I painted them with white Gesso, to completely cover the burgundy color, inside and out

I began painting the exterior of the shoes with purple paint, and having the layers be uneven, so that there appeared to be a variety of shades of the color

Using puffy paint, I carefully began drawing swirls and other designs on the shoe.  The paint takes 4 hours to dry, so I would paint a section, then move to the next shoe, and then wait.


I used a fan brush to carefully add a touch of green metallic paint over the surface of the shoes, which added dimension

You can see it closer here

Then I carefully painted more purple acrylic paint in and around the designs
Then I decided that I really needed to use the puffy paint on the foot bed of the heels.  It brings it altogether!  The high heels were sealed with Liquitex Clear Gloss - 2 layers.

Just a little labor intensive, but at the end of the day, beauty prevails
Ocean Dreaming by Jamie Fingal


Tuesday, December 11, 2012

The Forest Fairy Shoes come to life!

Welcome everyone! My name is Desiree Habicht and I am thrilled that you are considering decorating a pair of shoes for this important charity. When I was asked to be a part of the kick off I was thrilled. I want to encourage you to become a part of the "Kick off your Heels" event by joining our group of artists that are going to try and make a difference for Womens Heart Health. Stir up your creative juices and jump in with us!

I am going to share my magical secrets for the construction of the Forest Fairy shoes that were made especially for the Forest Fairy Summers Ball! The story of the shoes is at the end of this post.

1. First I had to find the right shoes, ones that would be able to carry all the gathered materials and still be able to trip the light fantastic, I found these shoes which were perfect! The first thing I did was gesso them black!

I then even decided to gesso the shoebox they came in, I think I might paint it to look like wood!
I then painted the inside of the shoes with copper metallic paint and copper glitter. I found a wonderful coppery wire edged ribbon that I cut the wire off of and decoupaged the ribbon onto the shoes. I then took some magical Fairy Art and decoupaged it onto the front and back of the shoes. I used Gel medium but Mod Podge would also have worked. 

Next I glued moss onto the shoe platform and glued colored, decorative thread/ cord onto the shoe in circles and then around the little art pieces. Next I took ribbon and covered the heel.
I took my husbands drill and drilled tiny holes around the top edge of the shoe and wired the berries around the opening. I then glued white moss around the thread circles and made them look like moss forest flowers and added leaves. I then wired on the bow at the toe of the shoe and glued the wooden flower on top of the bow.

I then added another bow on the heel of the shoe and put a small birds nest into it. I finished off the Forest Fairy Shoes with small pearls and red berries that are set into the moss. I added some pretty blue flowers around the white wooden flower on the toe for more color and Wa La, finished.


 This is the story.....
If you happen to be in the Forest on a warm summers night and you hear the soft rustling of the leaves, its the wind playing the melody for the Fairy Ball and you have stumbled into the magic! On special summer nights the Forest Fairies gather and have the most amazing Summers Ball, dancing until all hours of the night. Their costumes and shoes are made just for these special events constructed from materials found in the forest and studded with treasures stolen from passers by without their knowledge. Once the festivities are over the Fairies hide their shoes in the Forest for the next Summer Ball where they will once again dance to the melody of nature, in the moonlight, under the stars, filling the forest with their magic!


Tuesday, December 4, 2012

The making of silk flowers

Sue Bleiweiss here...

My original vision for these shoes was something completely different from where I ended up with them.   About midway through the process of working with my first idea I decided it just wasn't working so I put the shoes away for a couple of days and then started again.  Here's a look at the process I went through and how I ended up where I did with them...

I should first tell you that my original vision was to create a pair of "shoe trees".  I wanted to create a pair of shoes that looked like the trunks of trees with a hollow inside that I had planned to fill.  So I went out and bought a really ugly pair of turqoise heels from the clearance rack at Target and painted them with some black gesso:


 Then I added some cylinders made from rolled Timtex and covered the entire shoe in strips of silk and gesso.  Sort of like paper mache only with strips of silk and gesso instead of strips of paper and paste.

They sat on my work table for a couple of weeks and each time I looked at them I just wasn't feeling very happy with what I saw.  The next step was to paint them to look like tree trunks but I just wasn't feeling it.  So I decided to start again and ripped off everything I did and began again.

I started this time by covering the entire shoe with strips of silk and white gesso and then once that was dry I painted them black and dabbed on some turquoise paint.


Then I added several layers of paint using colors like metallic rust, bronze and copper.

Each layer I added contributed more depth and richness to the final layer.  Once they were dry I added the flowers and leaves which I made from some painted silk.


  The flowers were cut using my Sizzix die cutter and the Tim Holtz Tattered Florals die.

 The leaves I cut using my Accuquilt and the leaf shape is from the Round Flower die.

The centers of the flowers are metal flowers that I found in the jewelry department of the craft store.  I hope you enjoyed seeing how I created my shoes "silk flowers"!