Sunday, December 16, 2012

Ocean Dreaming

Jamie Fingal checking in to share my process for 'Ocean Dreaming.'  This pair began with burgundy snake skin-like high heels, and if you look in the left corner of the picture, you can see the original shoe.  I was painting a couple of pairs at one time, so that is why there are 4 high heels in the picture.  I painted them with white Gesso, to completely cover the burgundy color, inside and out

I began painting the exterior of the shoes with purple paint, and having the layers be uneven, so that there appeared to be a variety of shades of the color

Using puffy paint, I carefully began drawing swirls and other designs on the shoe.  The paint takes 4 hours to dry, so I would paint a section, then move to the next shoe, and then wait.


I used a fan brush to carefully add a touch of green metallic paint over the surface of the shoes, which added dimension

You can see it closer here

Then I carefully painted more purple acrylic paint in and around the designs
Then I decided that I really needed to use the puffy paint on the foot bed of the heels.  It brings it altogether!  The high heels were sealed with Liquitex Clear Gloss - 2 layers.

Just a little labor intensive, but at the end of the day, beauty prevails
Ocean Dreaming by Jamie Fingal


Tuesday, December 11, 2012

The Forest Fairy Shoes come to life!

Welcome everyone! My name is Desiree Habicht and I am thrilled that you are considering decorating a pair of shoes for this important charity. When I was asked to be a part of the kick off I was thrilled. I want to encourage you to become a part of the "Kick off your Heels" event by joining our group of artists that are going to try and make a difference for Womens Heart Health. Stir up your creative juices and jump in with us!

I am going to share my magical secrets for the construction of the Forest Fairy shoes that were made especially for the Forest Fairy Summers Ball! The story of the shoes is at the end of this post.

1. First I had to find the right shoes, ones that would be able to carry all the gathered materials and still be able to trip the light fantastic, I found these shoes which were perfect! The first thing I did was gesso them black!

I then even decided to gesso the shoebox they came in, I think I might paint it to look like wood!
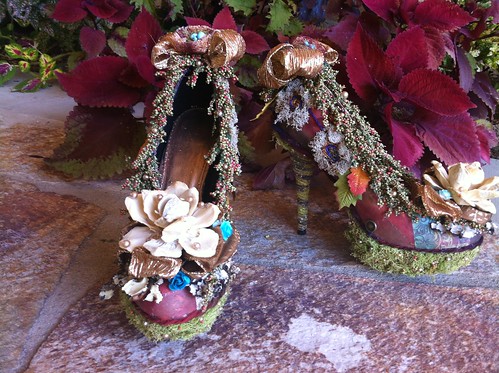
I then painted the inside of the shoes with copper metallic paint and copper glitter. I found a wonderful coppery wire edged ribbon that I cut the wire off of and decoupaged the ribbon onto the shoes. I then took some magical Fairy Art and decoupaged it onto the front and back of the shoes. I used Gel medium but Mod Podge would also have worked. 

Next I glued moss onto the shoe platform and glued colored, decorative thread/ cord onto the shoe in circles and then around the little art pieces. Next I took ribbon and covered the heel.
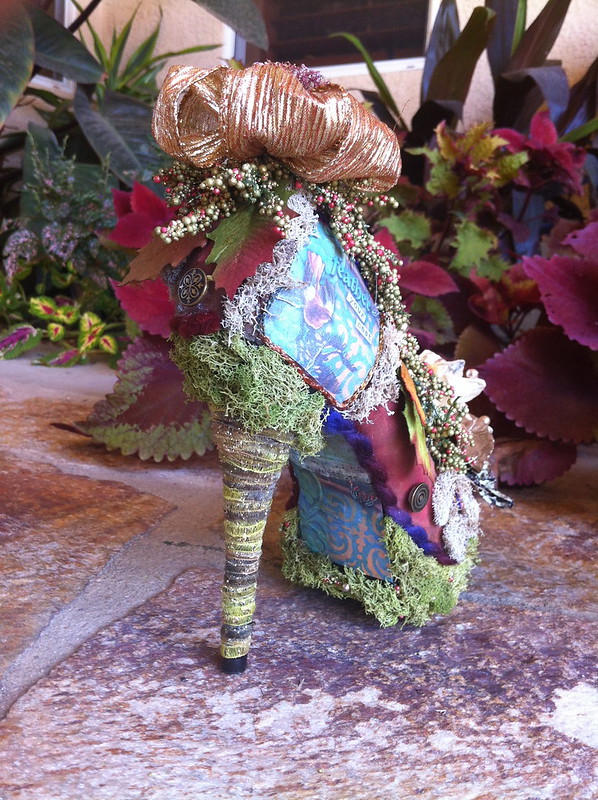
I took my husbands drill and drilled tiny holes around the top edge of the shoe and wired the berries around the opening. I then glued white moss around the thread circles and made them look like moss forest flowers and added leaves. I then wired on the bow at the toe of the shoe and glued the wooden flower on top of the bow.

I then added another bow on the heel of the shoe and put a small birds nest into it. I finished off the Forest Fairy Shoes with small pearls and red berries that are set into the moss. I added some pretty blue flowers around the white wooden flower on the toe for more color and Wa La, finished.


 This is the story.....
If you happen to be in the Forest on a warm summers night and you hear the soft rustling of the leaves, its the wind playing the melody for the Fairy Ball and you have stumbled into the magic! On special summer nights the Forest Fairies gather and have the most amazing Summers Ball, dancing until all hours of the night. Their costumes and shoes are made just for these special events constructed from materials found in the forest and studded with treasures stolen from passers by without their knowledge. Once the festivities are over the Fairies hide their shoes in the Forest for the next Summer Ball where they will once again dance to the melody of nature, in the moonlight, under the stars, filling the forest with their magic!


Tuesday, December 4, 2012

The making of silk flowers

Sue Bleiweiss here...

My original vision for these shoes was something completely different from where I ended up with them.   About midway through the process of working with my first idea I decided it just wasn't working so I put the shoes away for a couple of days and then started again.  Here's a look at the process I went through and how I ended up where I did with them...

I should first tell you that my original vision was to create a pair of "shoe trees".  I wanted to create a pair of shoes that looked like the trunks of trees with a hollow inside that I had planned to fill.  So I went out and bought a really ugly pair of turqoise heels from the clearance rack at Target and painted them with some black gesso:


 Then I added some cylinders made from rolled Timtex and covered the entire shoe in strips of silk and gesso.  Sort of like paper mache only with strips of silk and gesso instead of strips of paper and paste.

They sat on my work table for a couple of weeks and each time I looked at them I just wasn't feeling very happy with what I saw.  The next step was to paint them to look like tree trunks but I just wasn't feeling it.  So I decided to start again and ripped off everything I did and began again.

I started this time by covering the entire shoe with strips of silk and white gesso and then once that was dry I painted them black and dabbed on some turquoise paint.


Then I added several layers of paint using colors like metallic rust, bronze and copper.

Each layer I added contributed more depth and richness to the final layer.  Once they were dry I added the flowers and leaves which I made from some painted silk.


  The flowers were cut using my Sizzix die cutter and the Tim Holtz Tattered Florals die.

 The leaves I cut using my Accuquilt and the leaf shape is from the Round Flower die.

The centers of the flowers are metal flowers that I found in the jewelry department of the craft store.  I hope you enjoyed seeing how I created my shoes "silk flowers"!